
Video Conversion with Alley
Let's face it. Only a special kind of masochist will really enjoy codecs and converting. Although some people may get a perverse pleasure out of getting deep into GOP structures, context-adaptive binary arithmetic coding and variance adaptive quantization, most of us just want to get on with making the screen go flashy flashy.
This is why we introduced the DXV codec and conversion tools in Alley. There's no deep knowledge required. All you need to remember is DXV = love and Alley = life.
Converting in Two Clicks
After adding a file to Alley, of course using drag and drop like a boss, you will see a Convert button on the bottom of the list.

Go ahead and click that bad boy. The file will be added to the Convert list and Alley will switch to the Convert tab. Don't worry about all the settings here, we'll go into that later. Really all you need to is click in the same place, where there is now a Queue button.

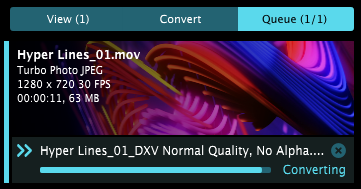
Click that bad boy again and the file will start converting. Alley will switch to the Queue tab where you can monitor the conversion progress.
 Once done, you'll have a DXV encoded version of your original file ready to go, right next to where the original was. That's it. You're done.
Told you this was simple.
Batch Conversion
Of course, you often need to convert multiple files at once.
In Alley, this is just as easy as converting a single file. You just add multiple files to the View list, select them all using CTRL-A (CMD-A on a Mac), hit that Convert button and then hit that Queue button.
Boom. Alley will utilise all your computer's CPU cores to convert your files as quickly as possible. It will show you the overall progress in the bottom area where the Convert/Queue button was.
You can leave Alley do its thing and go back to what you were doing. When it's done, you'll find the DXV encoded versions right next to your original files.
Image Sequences
You can use Alley to convert an image sequence into a video.
Save your sequence in a separate folder, and make sure each image is named sequentially. Next, drag the folder in to Alley. Alley will see that the files are supposed to be a sequence and will display, cue and convert them as a single file.
Conversion Settings
Of course, after adding a file to the Conversion list, you can dig a little deeper to fine tune how it will be converted.
Video
 DXV Format
Here you can choose which flavor of DXV you want to encode to. You can read more about why DXV is so awesome and when to use each of those flavors here.
When in doubt, DXV Normal Quality, No Alpha is always a safe bet.
 Size
Size
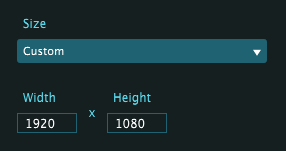
This is where you define the size in pixels of your converted file. Usually, you'll want to stick to Same as Source. If you need a specific size, you can choose from a list of often used resolutions, or enter specific custom values.
Scaling
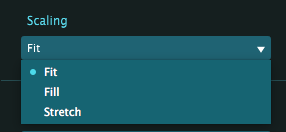
Should you choose to render to a fixed resolution, you get to decide how the original image is fit into the new frame.
- Fit will make sure you see the whole image undistorted, adding black bars on the sides or top and bottom.
- Fill will make sure the whole frame is filled, but you'll lose parts of the image.
- Stretch doesn't care about aspect ratio and just stretches the original to the new dimensions.
Trim
Use the slider below the monitor to trim your footage to length. More precise trim tools can be found under the conversion settings.
Audio
If your original file has an audio track, you can convert that right along with the video.
It will be converted to Linear PCM audio. You can adjust the Sample Rate and Bit Depth if you so desire.
Of course, you can choose to remove the audio track completely by unchecking the audio box.
Output Folder
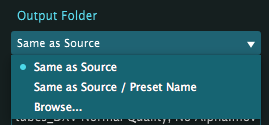 This is where you decide where your converted file goes when it's finished.
- Same as Source will keep it in the same folder as the original. To keep track of which is which, Alley will append the preset name to the end of the file. You can read more about presets just below.
- Same as Source / Preset Name will create a subfolder next to the original file, using the preset as the name for the subfolder. The converted file will then go in the subfolder, while keeping its original name. This is a great way to keep track of a set of files that need to be replaced by their DXV versions.
- Finally, Browse... will let you pick a specific folder to convert to.
File Name
You can also pick a specific name for the converted file. This is best used only when converting single files. Should any naming conflicts occur by having duplicate filenames, Alley will resolve them best it can by adding numbers to the converted files.
Presets
If you find yourself using particular conversion settings a lot, you'll want to save those settings in a preset.
Alley ships with four presets for the four flavors of DXV, but you can add as many as you want.
First get your settings to where they're juuuuust perfect.
When you change any value, you'll notice the Preset dropdown changes to Custom. Open that Presets dropdown and hit Save... You can then choose a preset name, very similar to how presets work for effects and MIDI and OSC and all the things in Resolume.
Tip! Choose your preset name wisely, because it's used for naming your files and folders. You can see that your converted filename updates when you change presets.
Bonus Tip! Every setting is part of the preset, including the Output Folder! This means you can choose to always convert your files to a particular place on your computer, like your Desktop.
Magical Power User Powers
There's a few ways that you can speed up your conversion workflow and become a conversion super hero.
Convert with specific preset
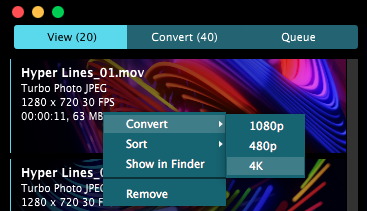 Instead of adding a file to the Convert list and then choosing a preset, you can right click on the file and choose the preset from the list.
The file will then be added to the list automatically using the chosen preset.
This also works with multi selection!
Convert with multiple presets
After adding a file or files to the Convert list like this, the View list will stay focused. This will let you add the same files to the list again, this time using a different preset.
This will let you quickly prepare different resolution versions of the same file.
Adjust conversion settings
As we've seen, after adding a file to the Convert list, you can still fine tune its conversion settings. This also works when selecting multiple files and changing their settings simultaneously.
You can get really nitty gritty and use CTRL/CMD to select multiple conversion targets from the list, and dial in the settings for just those targets.
Queue specific files first
We've all been there. You just got handed a crappy thumb drive with 12 GB of Youtube rips and Beeple clips, two minutes before show. You're about to start the conversion process when the annoying tour manager comes running into front of house, shouting at you to get the DJ's ugly spinning logo loop up right now!
After telling him or her to chill because you're a professional, you can select just that file in the Convert list and hit the Queue button. That way, you know it'll be done first. When it's done, right-click to reveal it in your browser, get it up on the screen and then worry about the rest.