DMX输出
DMX输出只适用於Resolume Arena!
Resolume Arena 能够透过DMX,向LED光条或灯具输出你图像的颜色及亮度。
这意味你能够在低解像度的LED灯条或灯具播放影片,只要他们支援DMX输入。设计表演的时候想想这个吧,能够同时操控灯和影片啊。

使用 DMX Lumiverses
要使用DMX灯具,首先你需要建立一个DMX Lumiverse。
基本上,DMX Lumiverse 就是个DMX自己的世界,一个在Resolume里头的虚拟世界。正如一般的DMX世界,DMX Lumiverse由512条通道组成。利用Lumiverse,你可以整理和安排灯具,指定DMX输出的通道。
这样,你就能够在家中准备好像素图。演出时,你可以将一整个Lumiverse分配到实体装置或者Art-Net 节点。而且,你也可以很快更改DMX输出装置,无需重新建立像素图。
提示!Lumiverses 不是一个常用的 DMX 专用名词。 它只是出现在Resolume里,来组织你的输出的。不要用Lumiverse这个词去和你的表演现场的伙伴沟通。他可能会觉得你语无伦次。
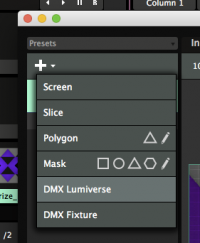
使用+菜单就能建立Lumiverse。
 一個Lumiverse尤如一個屏幕,有著相同的不透明度、光度、對比度及顏色選項。他們的工作原理也一樣。
另外,它也有影格速率及延遲設定。
影格速率
影格速率决定(每秒)有多少次送出Lumiverse的数据。
数字越大,代表灯具反应越快,但表现效能需求亦较高。即代表你每秒钟透过数据线传输更多的数据。
延迟
延迟决定渲染每格影象至输出DMX数据之间的延迟时间 (以百分秒计算)。这是用来同步灯光与投影机。
预设时间会是 40百分秒已经给你不错的灯光与投影机同步结果。
当你使用Resolume控制像素灯带或单一灯光时 ,你可以把这个值设成0,以得到即时的输出,而不会有任何延迟。
使用DMX灯具
建立DMX Lumiverse同时会建位一个预设的DMX灯具,里面含有1个像素的RGB资料。
除非你用DMX讯号控制太阳,要使用不同的灯具,1个RGB像素明显不够。右手边的下拉菜单让你选取灯具的各种预设。
提示! 如果你想要的灯具不在表单内,无须烦恼。要建立你个人的灯具预设其实很简单。详情请查阅灯具编辑器。
假设你有三个LED光管。每枝光管有16个RGB灯,排成三角形出现在舞台的中心。
选择灯具
首先要做的,是将预设灯具改变至表单上相应的选项。
你会发现灯具的名称变了。而灯具的选取输入范围会比之前扩阔16倍,这是因为你指定了16个像素的颜色。
安排灯具的位置
你可以移动丶缩放及转动灯具的输入源,以配合舞台上灯具的实际位置。假设输入源有800×50个像素。将输入源在选取输入视窗放置在下方中心位置,你就能够把输入源分配至合成下方中心位置。Resolume会采样每个方格的中心像素,作为RGB通道的输入源。切片下方的预览窗显示实时传送的颜色。
提示! 当然,改变输入灯具的像素大小不会改变LED光管的大小。合成里面的大小也不会对灯具在舞台的实际位置有甚麽影响。但你仍然需要配对其他舞台元素的输入大小及位置,包括投影表面或LED电视墙的组成,得以能够在各显示屏及灯具建立对称的影像。
更多灯具!
利用那个略大的'+'下拉菜单建立另一DMX灯具。这个新灯具也拥有16个像素,是条灯条。建立新DMX灯具时,Resolume会将先前使用的灯具作为预设。
长度和阔度参照上一个灯具,转动至-60度,斜斜放置,让左下方形成直角三角形。
在左边的列表或在选取输入页面右击灯具,以建立第三个灯具。将其转动至60度,那麽我们的三角形就完成了。
提示! 利用滑鼠滚轮或CTRL+或-(在Mac上用CMD+或-),以放大及校准灯具切片的位置。你可以用左右调较工具或按空白键左右调较画面。

发送 DMX 讯号至LED灯具
设置所有输入源以後,是时後输出一些东西到LED灯管。
在DMX Lumiverse按右键,好像屏幕的工作原理一样,Resolume会显示一系列网络上侦测到的Art-Net节点。
你只需选取你想使用的节点名字,Resolume 会帮你填写覆杂的部分,像是IP addresses 地址及DMX域。
提示!如果你的設備在名單中沒有顯示,請確定設備的IP地址與Resolume中的IP地址範圍是一樣的,而且是使用相同的子網絡遮罩。

选择正确的网络介面
你的电脑可能拥有有线及无线网络介面。如果你的 Art-Net节点是在你连线的网络,但Resolume在无线网络里寻找的话,你可能看不到它。
 你可以透过偏好设定里的DMX栏确认你的Resolume在正确的网络。
使用手動設置IP地址
你可能使用自制的Art-Net设备,像Arduino。
这个情况下,它可能不会显示在节点列表上,但你仍能在其上发布Art-Net讯号。在右手面,目标IP的下拉选单选择IP地址,你就可以手动输入IP地址。
记住此时,你可能也需要手动设置DMX域及子网络。对於大部分装置,预设的第一个接口是在子网络0中的DMX域 0。
当发送Art-Net讯号到特定的命名节点,Resolume会记住该节点之名字,以及不段发送讯息到该节点,除非你是更改IP地址。当发送到特定的IP地址之时,Resolume会不断发讯息到该 IP地址,即使设备更改了或已没有任何设备。
使用广播
除了发送讯息到特定的节点,你也可以使用网络中的设备广播你的DMX讯号。
如果发送讯息到单一节点,就好像你先叫那个人的名字,再叫他帮匄一样(喂!鲍伯!可否帮我丢掉这件垃圾?")广播是差不多的道理,只不过是在大声呼叫,希望有人听到你的要求(各位,我们需要有人把这件垃圾清理掉!马上!)
当广播的时候,你不需要设定IP地址,但你需要设置你相对的子网络及DMX域。
但当你用到30个或以上的DMX域,你最好停掉广播功能而使用千兆交换机或单播功能 。
使用DMX USB设备的注意事项
Resolume Arena 6 不支持 Enttec DMX USB 设备。如果你想使用 Enttec DMX USB 设备,你唯一的选择是用回Arena 5。
避免用太多技术用语,每一间USB DMX灯具制造商会使用他们专有的沟通协议。这让要维护它们在正常使用上变成恶梦。所以,我们决定只支持Art-Net协议的设备。Art-Net是工业标准。这意味如果你的设备支持Art-Net的话就能永远於Resolume上使用。
因为USB设备只可以使用1至2个DMX域,而Resolume 只支持Art-Net通讯的解决方法。
Showjockey和另外几间公司有一些设备可在单一Art-Net连结中控制8个或16个DMX域。如果你不怕DIY的话 ,我们还有几个便宜的选择。
接驳Lumiverse

切换回屏幕设置,选取你的Lumiverse并切换至DMX输出栏标。DMX输出能够总览灯具在Lumiverse里的分布。你可以见到,第一个灯具占了48条通道。数字没错,因为它有16个像素,每一个有红色丶绿色及蓝色三组数值。(16*3=48!)
第二个灯具由通道49开始,紧接着第一个灯具。第三个灯具则由通道97开始。这些起始通道应该对应LED光管上的开关设置。这样,Resolume就知道应该传送哪组像素到哪条灯管。

提示! 不懂二算法的读者,你可以在灯具资料栏标下方看看如何设置那些光管开关。
如果你的LED灯管各自有不同设定,你只需将灯具拖曳到DMX输出栏标。你会发现起始通道以及那些开关懂得自动更新。你喜欢的话,可以直接调整开关,又或者在起始通道直接输入。你的灯具会在Lumiverse里作自动安排。你要确定通道没有互相重叠,否则结果会会很奇怪。若真的发生,Resolume会发出警告,用红色标示重叠了的通道。
在设定起始位址之後,LED灯管会对应你对其播放的讯号发生反应。如果一条或多条灯管错误放置及倒置,你可以利用Pacman标来翻转输出的讯号。你亦可以按需要调整亮度及对比度。
调整你的输出
检查你的输出有没有正确对齐,你可以使用输出菜单中的测试卡。
测试卡会有一条对角线横跨屏幕,你会很快发现你的LED灯是否与你在现实的世界中的灯对应,而要如何用输入选择栏去作出调整。
如果有出错,首先利用DMX输出栏标,确定起始通道是否互相配合。同时,在讯号输出到灯具之前,你可能需要用Pacmam将其垂直或水平翻转。